Message Center / FrontDesk Tab
| Quick Guide for Dispatchers | Back Forward Print this topic |
Welcome
Your organization has made the decision to use the MyFBO online scheduling and aviation information management system. This system will provide many benefits to your employer and your customers. There are also benefits for you:
Getting Started
You will be provided with login information by the administrator of your MyFBO system. You will most likely gain access to the system from a link on your organization's website.
The first time you log in to the system, you'll use a temporary password. You will immediately be required to create a new password that will be known only to you. For system security, it is important that you keep your login and password private. Every action you take in the MyFBO system is tracked by your unique identification, which is helpful in determining who scheduled a student, changed a reservation, canceled a flight, etc.
After you've changed your password, you'll be asked to review and update your personal information. Please take the time to do this thoroughly. It is essential that you have a valid Primary E-mail address in your information. Your e-mail address in the system is used to send various notifications and informative emails from your organization. Your Primary E-mail address is also your primary login code. If you ever forget your password, the system will offer to send a new password to you ONLY if you have a primary e-mail address on file.
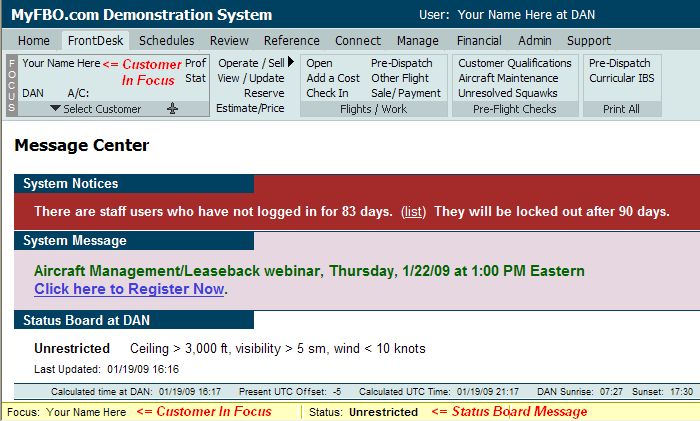
After you've updated your personal information, you will arrive at the main page in your MyFBO system. All staff users land on this Message Center page, with the FrontDesk menu active (see example screenshot below).
Message Center / FrontDesk Tab
System Navigation
It is important to take some time to explore and become familiar with the menu system and functions. For a general overview of the menus and how to use them, please read the following linked document:
The menu you see when logged in to the system may not be exactly the same as the menu of a co-worker. This is because your menu is specifically suited to the tasks that you perform, and is customized based on access levels granted to you by your System Administrator. Typically front desk / dispatch staff will have the following menu tabs:
Each of the links above opens a new window containing a short document about the possible options found on that menu tab. The options available to individual users vary due to the security level of the user and the system options in use by your organization.
Learning to Use MyFBO
MyFBO has extensive online help documentation available. Any time you are in
a MyFBO system, you can use the blue question mark (![]() )
icon in the system header to access the help system. You will also see
throughout the system blue and red question mark (
)
icon in the system header to access the help system. You will also see
throughout the system blue and red question mark (![]()
![]() ) icons next to
menu options. Clicking on the blue will bring up the help document specific to
that function and the red will bring up an e-Learning for that function. If you
don't find the answer that you need, you can also enter a support request via
the Support Tab. There is also always a small Enter Support Request
link in the footer of the system. MyFBO support staff are always happy to help if you have a question or
problem, so please do not hesitate to enter a support request.
) icons next to
menu options. Clicking on the blue will bring up the help document specific to
that function and the red will bring up an e-Learning for that function. If you
don't find the answer that you need, you can also enter a support request via
the Support Tab. There is also always a small Enter Support Request
link in the footer of the system. MyFBO support staff are always happy to help if you have a question or
problem, so please do not hesitate to enter a support request.
A very helpful tool in learning to accomplish specific tasks in the system are e-learnings. e-learnings are pre-recorded, interactive tutorials that can be quickly viewed online. There are many e-learnings available within your MyFBO system from the Support Tab.
To get started with the basics that you'll most likely need to know, please watch the quick e-learnings linked below.
Scheduling
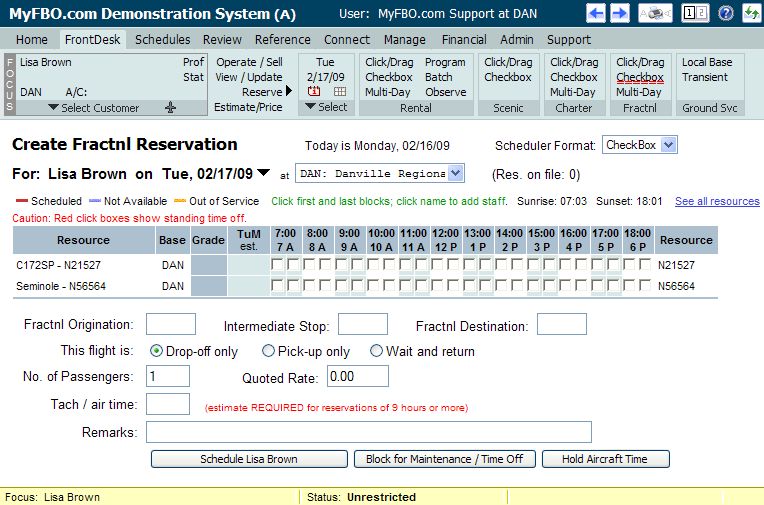
Flights and Ground Services may be scheduled from the FrontDesk Tab by putting a customer In Focus. Please review the screen shot below to see these options emphasized in red. For more detailed information about using the FrontDesk Tab and putting a customer In Focus, please read FrontDesk Tab.
Scheduling Options

Reservation Types
There are a number of reservation types that can be made depending upon which types have been enabled in your MyFBO system. These different types exist because different data is tracked for each (for example, rental versus instructional), and the system Qualifications and Limitation checker works by checking different customer and pilot information based on flight type (for example, solo rental versus scenic). The different types of reservations that can be made are:
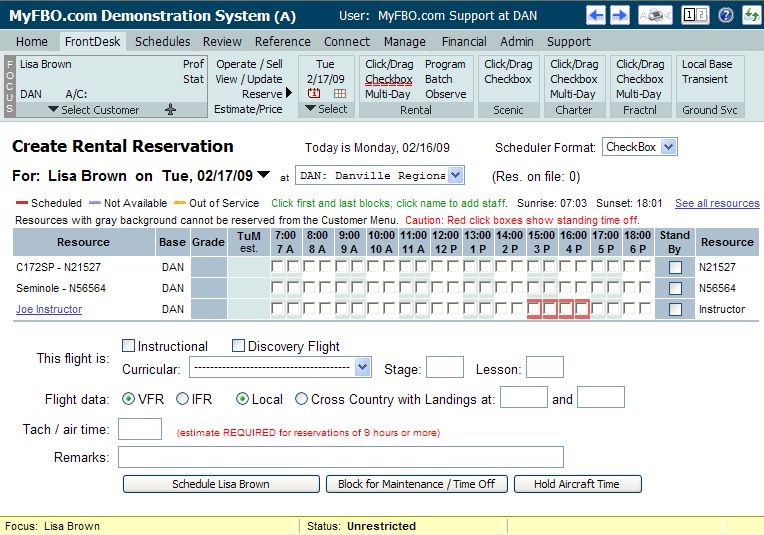
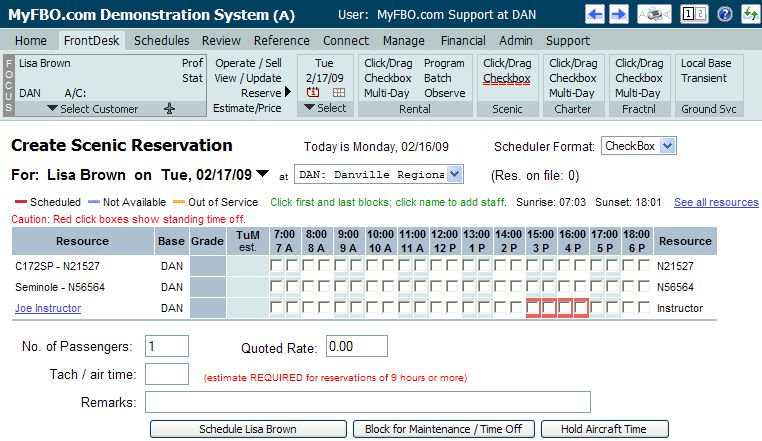
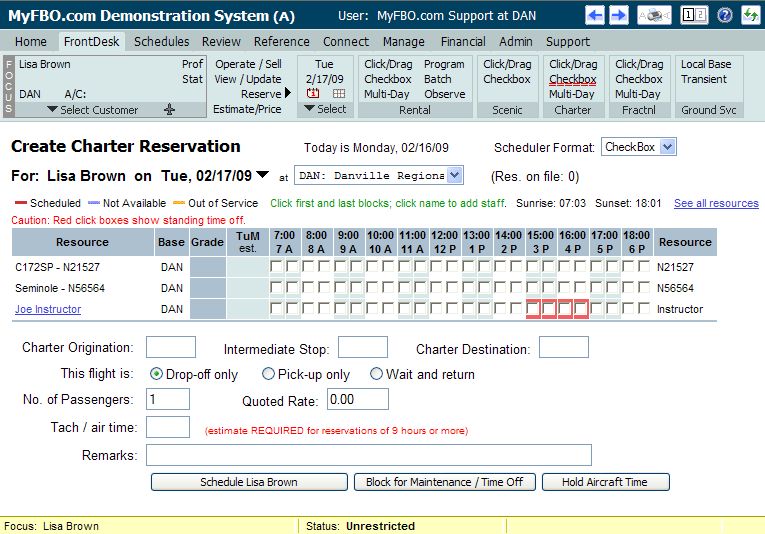
Because different reservation types require different information, always pay attention to the information requested during the scheduling process. The screen shots below show how the process is the same for different types of reservations, but the information requested is specific to the reservation types.
Rental/ Instructional
Scenic
Charter
Fractional
Scheduler Preference
MyFBO offers two different scheduler formats so each user can select their preference. The format shown in the examples above is the Checkbox format and is probably the format most often used.
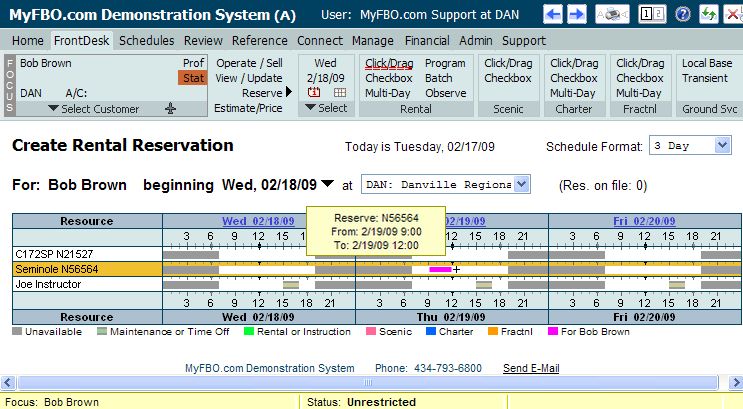
The other format is Click and Drag. For users confident with the mouse or for organizations where multi-day schedules are common, the Click and Drag Scheduler will likely prove the fastest way to create new reservations.
With Click and Drag, reservations are made using the mouse by left-clicking on the starting time for a reservation, moving the mouse pointer to the ending time while holding the left mouse button down (i.e., dragging), and then releasing the mouse button. To assist you in selecting the correct times, the online system provides a "tip" box showing the resource name, date, and time.
Click and Drag
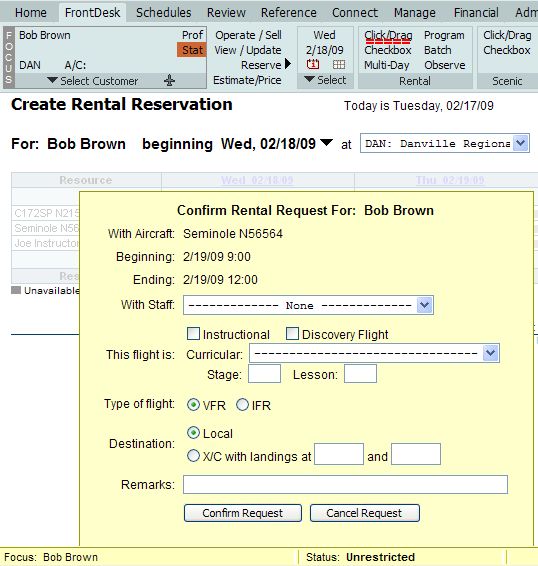
Once the mouse button has been released, the online system provides a pop-up window asking that you confirm the times selected, choose any additional resources, and provide additional details of the flight.
Click and Drag Pop-up
Once a reservation has been made using either scheduler format, a confirmation e-mail is automatically sent to the customer.
From your Home Tab / Personal Menu, your personal preference for a default scheduler format can be set. The options are Checkbox or 1, 2, 3, 4, or 6 day Click and Drag. Once a preference is set, you still have the option of using any of the scheduler types, but clicking "Reserve" on the FrontDesk menu with a customer In Focus will open your preferred scheduler.
View/Delete/Revise Reservations
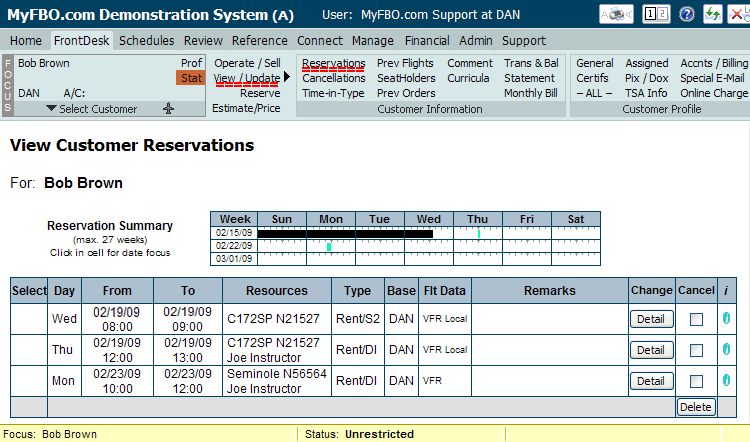
View Reservations List
There are many ways to access reservations for a customer in MyFBO. The fastest way to see a reservation list for a customer is to put the customer In Focus and select View/Update / Reservations, as shown in the screenshot below. If no reservations exist for the customer, an option will appear to schedule a future flight or handle an immediate flight.
View Reservations
View Reservation Details
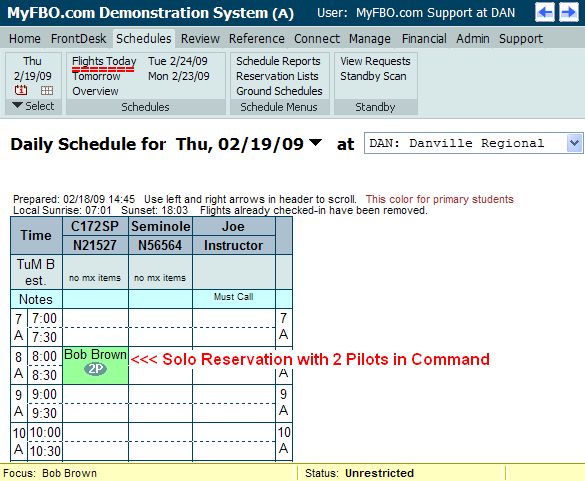
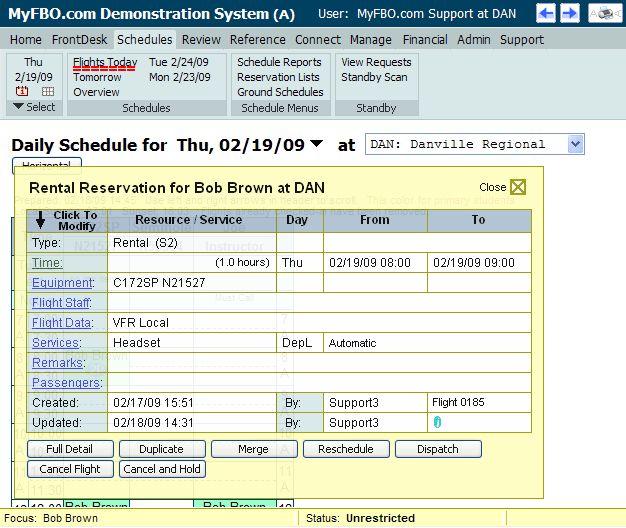
On the reservation list there are "Detail" buttons that allow access to the full details of an individual reservation. Reservation details are also frequently accessed from the Flights Today Schedule, which is the schedule view commonly used by Front Desk staff and dispatchers. This is accomplished by clicking the reservation block on the schedule, which results in a quick reservation details pop-up where the information can be viewed and /or the reservation can be revised.
Reservation Block on Flights Today Schedule
Quick Reservation Details Pop-up
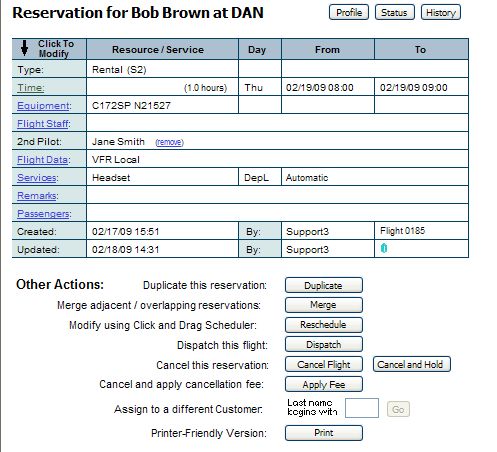
To view the most complete details of a reservation, use either the "Detail" button on the reservation list, or use the "Full Detail" button on the reservation details pop-up.
Full Reservation Details
Delete Reservation
Reservations can be cancelled from any of the various detail views, but the quickest way to cancel multiple reservations for a customer is from the reservation list. Simply click the cancel box next to the applicable reservations, then click the "Delete" button at the bottom of the page. The next screen will prompt you to enter the reason for cancellation, which is always recommended as this information is included in cancellation reporting. Once remarks are entered, a confirmation screen will appear. The confirmation screen will give options to print and/or notify the customer by email.
Note: Do not use the previous method if you intend to apply a cancellation fee. Canceling a reservation and applying a cancellation fee must start from either the full reservation details page (screenshot above) or the Review Tab / Dispatch Status page. For complete information, please read Cancellation Charges.
Changing Reservations Details
The Reservation Details page allows all the details of a reservation to be changed by using links in the "Click to Modify" column. Depending upon the reservation type and your system options, possible changes include:
To change the date or time of a reservation click the "Time" link in the left column of the Reservation Details page. The appropriate single day or multi day Modify Reservation Time page will appear. As you go through the process, note the option to "Notify Customer", which will send a confirmation e-mail of the change to the customer when the box is checked.
To add or modify equipment for a reservation click the "Equipment" link in the left column of the Reservation Details page. This link will open the Modify Equipment page. Aircraft can be removed, changed, or available aircraft may be added to the reservation. Also, any equipment listed as Other Resources may be added or removed. Other Resources may include headsets, handheld GPSs, etc. Note the options to "Notify Customer" and "Notify Staff" of the changes once made.
To add or modify Flight Staff for a reservation click the "Flight Staff" link in the left column of the Reservation Details page. This link will open the Modify Flight Staff page. Staff can be removed, changed, or available staff may be added to the reservation. Note the option to "Notify Customer" of the changes once made.
To add or delete Ground Services for a reservation click the "Service" link in the left column of the Reservation Details page. This link will open the Add/Delete Ground Services page. To delete a service click the delete button next to the listed service. To add a service, select the service on the drop down box, enter any description, and click the "Add Service" button. Note that ground services must be enabled by an Administrator in the Reservation Type Parameters.
Flight Data / Remarks
To add or delete Flight Data for a reservation click the "Flight Data" link in the left column of the Reservation Details page. This link will open the Modify Flight Data page. The Flight Data page contains fields for:
To add observers to a rental flight or passengers to a charter flight click the Observer or Passengers link in the left column of the Reservation Details page. These links will open the Seat Holder List page. From this page you may add people to the list. If there is no option to add anyone as a seat holder this means that observation is not allowed or that the aircraft is full. See Observation Opportunities for more information.
Dispatch & Check-in
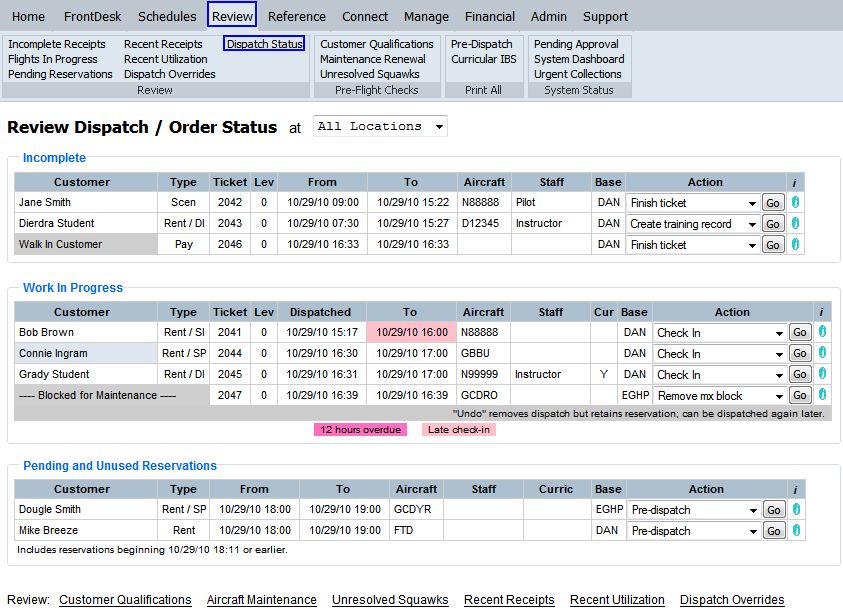
The Review Dispatch Status page available from the Review Tab is an important part of the system for dispatchers. This is where you see what is going on currently. You can dispatch, check-in, and finish receipts from this page. Drop down menus next to each flight line give you the options for the reservation/flight depending on current status.
Review / Dispatch Status
Dispatch a Flight
There are a number of quick ways to accomplish dispatch from an existing reservation. The two quickest ways are:
Note: Reservations coming close to dispatch time are made available for dispatch in the Pending and Unused Reservations list based on a setting made by an Administrator. The setting is "Reservations appear on Review page how many minutes before flights", and it's found in the Reservation Settings from the Admin Tab / Parameters & Settings menu.
Dispatch of a flight can also be accomplished from the Reservation Details page of any reservation.
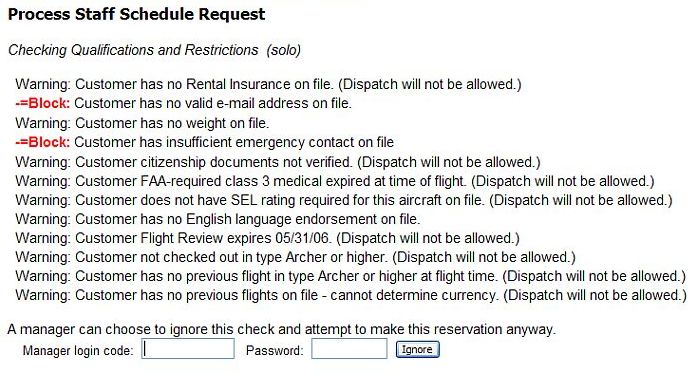
Reservation / Dispatch Warnings & Blocks
MyFBO has a very thorough Qualification and Limitations checker. The Q&L checker evaluates the records of a pilot/student for proper qualifications before processing a reservation or allowing dispatch. Depending on the settings established by the Administrator for your system, the Q&L checker may allow, warn, or block scheduling, dispatch, or both if certain information is not on file or qualifications are not met (e.g., Customer is Current). After first setup with MyFBO, you may see many of these warnings until the records of your customers get updated. Whenever a reservation or dispatch is blocked, a manager can override the block. Printing out the list of warnings/blocks is a good opportunity to discuss with your customer/student what information is still needed for their record.
Customer records can be updated as needed by putting the customer In Focus and clicking the View/Update action.
Q&L Checker Example
Check-In a Flight
When the Q&L checks are met successfully, a dispatch sheet is printed for the flight staff or pilot to carry with them. The dispatch sheet contains important flight related information, along with data fields to be filled in with required information after the flight is complete.
When the flight is complete, the information on the dispatch sheet is used to properly check-in the flight in the MyFBO system. Check-in is important. The information provided on the completed dispatch form provides for tracking of aircraft utilization, tracking of aircraft usage in relation to upcoming maintenance, tracking of staff flight and ground hours for payroll purposes, tracking of the same hours for customer billing purposes and Time In Type records.
There are a number of quick ways to accomplish check-in. The two quickest ways are:
After check-in, the system automatically opens a receipt / ticket for the customer with charges generated. It may or may not be your responsibility to finish the receipt and accept payment. If it isn't your responsibility, you should use the Finish Receipt Later link at the bottom of the receipt. Do NOT use the link to Cancel This Transaction as all data related to the flight will be lost.
For more detailed information about preparing receipts, please read Guide to Receipt Preparation.
For more detailed information about Dispatch & Check-in, including how to handle special situations and correct errors, please read Dispatch and Check In Basics.
Customer Information
New Customers
New customers are added to the system using the Focus portion of the FrontDesk Tab.
Updating Customer Information
Any piece of customer information can be changed by putting the customer in focus from the FrontDesk Tab. Then hover over the View/Update action to see the options to the right, or simply click View/Update as a shortcut to the complete Customer Information / Profile page.
FrontDesk Tab / View/Update

Change or Reset Customer Passwords
Staff level users can reset a customer password (if enabled in the Staff Parameters by an Administrator) and unlock a customer from the General Information page in the customer record.Forgotten / Invalid Passwords / Locked Out Customers
Many times your customers will forget their passwords. They attempt to login with their e-mail address on file and their password. If they get the password wrong, the system offers to email a new password to them. If the system doesn't recognize their login, it tells them it would like to email their information but doesn't recognize them, to please call for assistance. They get 4 attempts at this, with offers of help each time.
As a security measure, on the 5th bad login attempt, the customer is locked out for 45 minutes. If they keep trying, the lock out clock restarts. After 45 minutes, they can login again, assuming they have their valid login information at that time.
If you put the individual that is locked out in focus and click on Prof, you can see when their 'lock-out' period ends. The time appears in RED under the Additional System Information section at the bottom of the profile.
If a customer is locked out for this reason, you can unlock:
Resetting Customer Passwords
Only an individual user can change their password. Staff users cannot see or set passwords for customers. Staff level users can reset a customer password (if enabled in the Staff Parameters by an Administrator).
To reset a customer's password:
Temporary customer passwords are always the word reset.
| Copyright © MyFBO.com [email protected] |
05/25/11 cli