Receipt Preparation Process
Receipt preparation in MyFBO is a five step process:
- Step 1 - Enter charges
- Step 2 - Enter special offers, returns, rebates, reimbursements
- Step 3 - Enter payment made by or refund made to customer
- Step 4 - Select customer account to charge or credit if applicable
- Step 5 - Close out receipt
The steps above can be repeated or omitted, but they must be executed in order. All step 1 and step 2 entries must be made before any step 3
entry; step 3 must be accomplished before step 4, etc. Without exception, every
valid receipt must have at least two line entries:
- A charge or credit from step 1 or step 2
- A payment or refund via step 3 or step 4
There are a number of ways to begin the receipt preparation process in MyFBO. The most common are:
- Continuation of the "check-in" process
- Using "Sale / Payment" options from the FrontDesk menu
- Using the "Other Flight" option from the FrontDesk menu
There are instructions listed below for preparing some
common types of receipts. There are also numerous e-learnings available on this
topic, making it possible to actually watch different types of receipts being
prepared. Please take advantage of these learning tools by using the links at
the top of this page, or by selecting the Online
e-Learning option from the Support Tab in your MyFBO system.
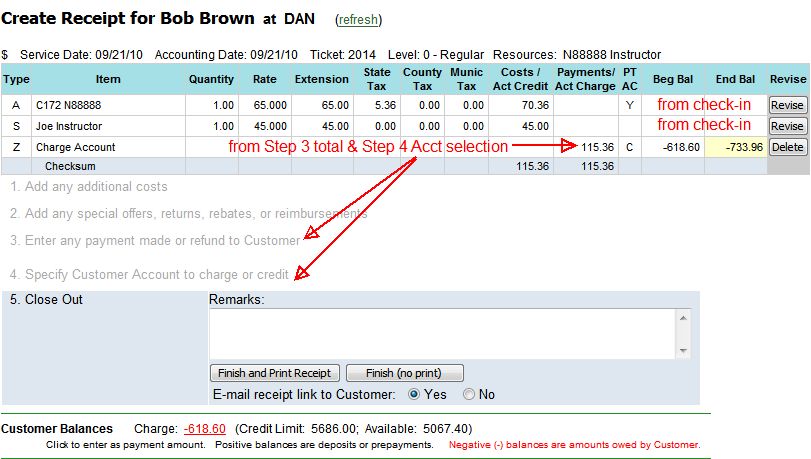
Receipt Preparation after Check-In:
- When the check-in process is used, aircraft and instructor/staff pilot times are automatically entered on the
resulting customer receipt and the appropriate rates for the use of those resources entered.
- Review charges created automatically and revise any that need to be changed.
- Add any additional charges using step 1.
- Add any credits using step 2.
- The payment required will automatically be shown in step 3.
- If a full payment is being made, select a
payment type and "Record Payment".
- If a partial payment is being made, enter the amount of payment, select a
payment type, and "Record Payment".
- If any portion of the receipt is to be put "on account", enter
the amount to be charged on account in the step 3 box and then drop down to
step 4 to select the account to be charged.
- Follow through step 5 to close out the receipt.
Receipt Preparation for "Other Flight" transactions:
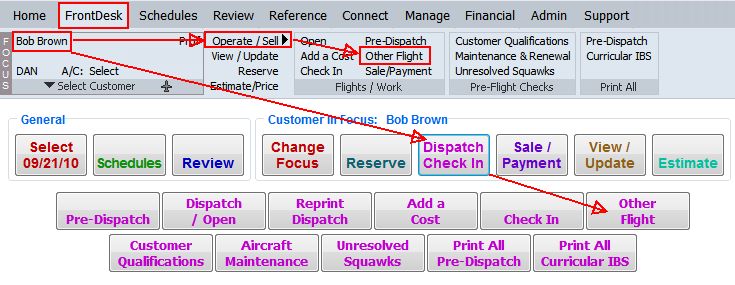
- "Other Flight" transactions are used for preparing receipts for flights
that did not involve a check-in. This option allows for the input of Hobbs
and Tach data after the fact, and can be dated for services in the past.
- To start the transaction, put the customer in focus and select
Operate/Sell, then "Other
Flight".
- Enter the appropriate date and transaction type, then "Create
Transaction".
- Select the resources that will be
on the receipt, and indicate if Instructional or Discovery Flight. Click "Check
In."
- On the resulting check-in form, enter check-in information as you would
normally.
- Review the charges created automatically and revise any that need to be changed.
- Add any additional charges using step 1.
- Add any credits using step 2.
- The payment required will automatically be shown in step 3.
- If a full payment is being made, select a
payment type and "Record Payment".
- If a partial payment is being made, enter the amount of payment, select a
payment type, and "Record Payment".
- If any portion of the receipt is to be put "on account", enter
the amount to be charged on account in the step 3 box and then drop down to
step 4 to select the account to be charged.
- Follow through step 5 to close out the receipt.
Receipt Preparation for Sale transactions:
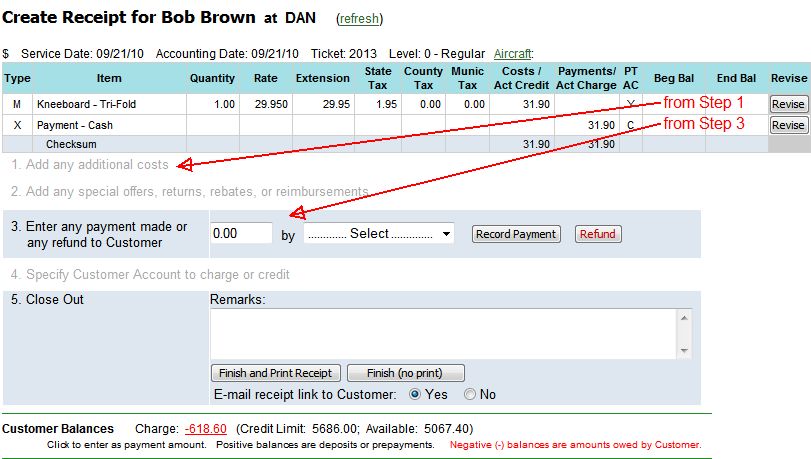
- Sale type transactions are used for sales not including aircraft
time, such as merchandise sales.
- To start the transaction, put the customer in focus and select
Operate/Sell, then "Sale".
- Add any charges using step 1.
- Add any credits using step 2.
- The payment required will automatically be shown in step 3.
- If a full payment is being made, select a
payment type and "Record Payment".
- If a partial payment is being made, enter the amount of payment, select a
payment type, and "Record Payment".
- If any portion of the receipt is to be put "on account", enter
the amount to be charged on account in the step 3 box and then drop down to
step 4 to select the account to be charged.
- Follow through step 5 to close out the receipt.
Receipt Preparation for Payment transactions:
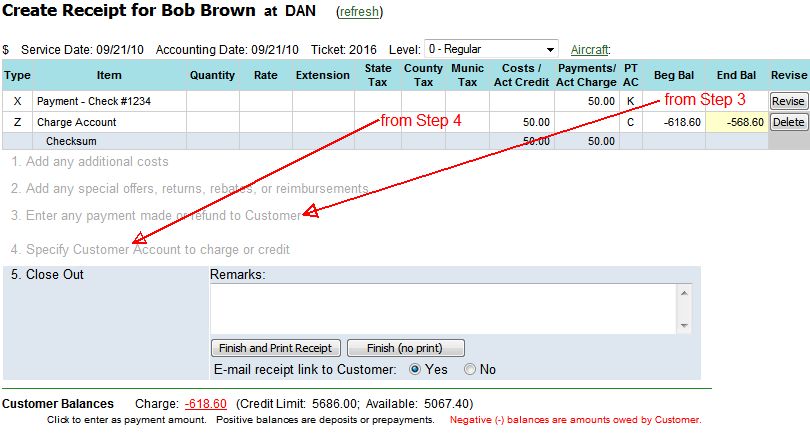
- Payment type transactions are used for payments made to a customer
account.
- To start the transaction, put the customer in focus and select
Operate/Sell, then "Payment".
- Go to step 3 and enter the amount of payment, select a
payment type, and "Record Payment".
- A caution box will pop up warning "There are no line items in this
receipt. Unless you are accepting a payment on account, please click CANCEL
and enter costs in step 1 first."
- Click "OK".
- Go to step 4 and select the appropriate account to which to post the
payment.
- Follow through step 5 to close out the receipt.
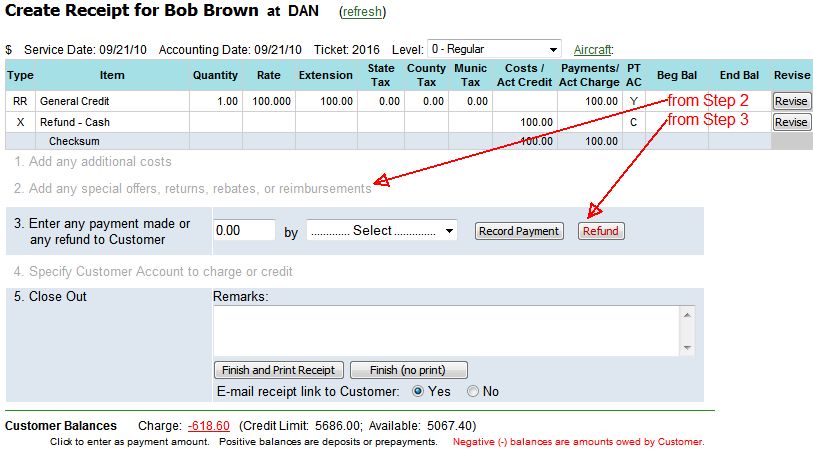
Preparing a Refund/Credit Receipt:
- To start the transaction, put the customer in focus and select
Operate/Sell, then "Sale".
- Go to step 2 and select General Credit if the purpose is to issue a simple
refund. Other detailed selections are available in this step if the refund
is for merchandise being returned, inventory items being returned, or if
flight or staff time was charged on a previous receipt but not actually
used. Once all credits have been issued in step 2, go to step 3.
- Enter the amount of refund/credit, select a refund/credit method, and click "Refund".
- If the refund is being issued to a prepay or charge account, enter the
amount of the refund in the step 3 box and then drop down to
step 4 to select the account to be credited.
- Follow through step 5 to close out the receipt.
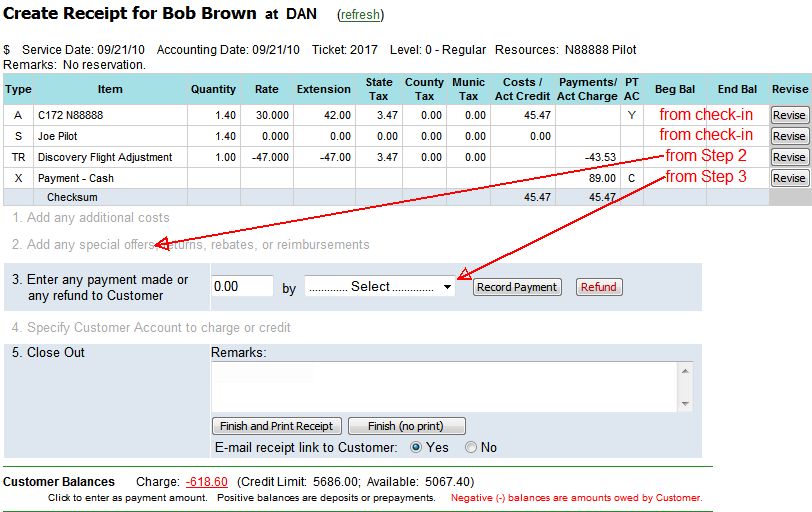
Receipts for Discovery Flights / Special Offers:
- Discovery Flights or Special Offer Flights are regular flights that are
offered at a discounted price not based on flight hours. These calculations
can be automated in the receipt process if enable and defined by the system
administrator in Parameters and Settings.
- Check-in flight normally. On the resulting receipt, the top
line items will show the actual "normal" charges for the aircraft and pilot.
Do not revise these line items.
- Go to step 2 and select "TR - Special Offer" and click "Add" .
- Select the applicable offer in the drop down box and click "Add".
- If there are additional charges, go back up to step 1 to add them.
- Go to step 3. The discounted customer amount due is already calculated. The amount includes tax if applicable. Select payment type and
"Record Payment".
- Follow through step 5 to close out the receipt.
Receipt Preparation when Redeeming a Gift Certificate:
- Open and prepare a receipt as normal through steps 1 and 2.
- After adding all charges, go to step 3 to redeem the Gift Certificate.
Input the Value of the Gift Certificate, select Gift Certificate as payment
type,
and "Record Payment".
- The Gift Redemption screen will appear with options to input the
certificate number for any type of certificate you accept. GiveAFlight.com
certificates require the entry of a certificate number and a redemption code.
Enter the appropriate information and review the verification options to
confirm the certificate matches the customer.
- If the gift certificate amount is more than the charges accrued, the
balance can be refunded to the customer in the form of a new gift
certificate, or put on the customer's prepay or monthly account balance via
step 4.
- Follow through step 5 to close out the receipt. If a new certificate is
being issued for a remainder balance, it will open to print at this time.
Refunding the Purchase of a Gift Certificate:
- Open a new receipt for the customer who purchased the gift certificate.
- Go to step 3 and enter gift certificate amount, payment method for refund
(usually credit card on file), and click "Refund". Follow through
the refund process.
- Go back to step 3 and enter the same gift certificate amount, payment
method Gift Certificate, and "Record Payment". Follow
through the redemption process. The gift certificate has now been
refunded and redeemed to make it no longer valid in the system.
- Follow through step 5 to close out the receipt.
Redeeming a Gift Certificate to a Prepay Account:
- A gift certificate can be redeemed straight to an existing
prepay account.
- To start the transaction, put the customer in focus and select
Operate/Sell, then "Payment".
- Go to step 3 and enter the gift certificate amount, payment method Gift
Certificate, and "Record Payment". Follow through the
redemption process.
- Go to step 4, select Prepay Account, and click "Go".
- Follow through step 5 to close out the receipt.
Notes:
The most recent closed receipts can be seen from the Review Tab
/ Recent
Receipts. Options are available to reprint a receipt or see a summary view of a
receipt. A duplicate of the receipt may be emailed using either of these
options. Receipts may also be reopened and adjusted from the summary view.
All receipts for a particular customer can be seen by putting that customer
in focus and selecting View/Update, then Transactions & Balances.
If a receipt is cancelled or deleted, all the data connected to that receipt is
deleted as well. For example: A receipt created from the check-in process may
include aircraft Hobbs and Tach time. Canceling or deleting the receipt deletes
this aircraft utilization information from the system.
Hobbs or Tach data on a receipt can be changed without adjusting or reopening
the receipt. This is accomplished from the Review Tab / Recent Utilization.
Click any ticket number on the Review Recent Aircraft Utilization page to revise
and update the information.
09/21/10 cli
