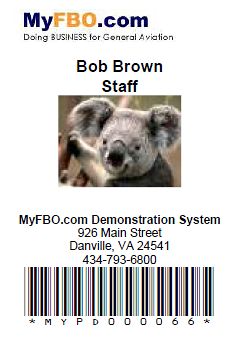
Example ID Badge

| ID Cards / Badges | Back Forward Print this topic |
See also:
Features & Options |
|
ID Cards / Badges
MyFBO supports the creation, printing, and scanning of Identification Cards / Badges. ID Badges are created using subscriber defined logos, address, the staff member's or customer's name and picture, and a unique barcode assigned to each individual.
The unique barcode allows for easy scanning for identification and accomplishing other tasks within the online system. ID Badges can be scanned using a barcode scanner.
Example ID Badge
When you scan a badge, the system will place the customer in focus, show the customer's reservations in the main work area, and also pop-up the customer's profile.
If you scan a dispatch ticket that has a temporary badge included, the system will attempt to find an open dispatch for that customer and start the check-in process.
To scan the bar code either from a badge or a dispatch ticket, first pop open the customer focus selector -- the yellow box where you would normally enter a few characters of the customer's last name -- and click and scan into that field.
Scan Entry
If you prefer using the button menu system, you can scan a customer into focus by selecting Change Focus / By Scan.
On the badge, the last 5 digits are the system's internal customer ID number. You can look up the same customer by entering that customer ID number in the focus field preceded by the pound sign. In our example, Bob Brown's badge code is MYPD900066, so typing #66 into the focus field will have the same result as scanning the badge.
Result from ID Badge Scan
Enable ID Badges
To create ID Cards, the following options must first be enabled via the Admin Tab / Features & Options:
Enable ID Badges
Once the above parameters are enabled, a new "Badge" parameter becomes available via the Admin Tab / Parameters & Settings menu.
ID Badges Setup
Once enabled, the Badge Parameters need to be defined.
Badge Parameters
Creating ID Badges
Once the parameters are set, follow these steps to create a badge:
Review Picture and Click Badge
Print Badge
Temporary ID Badges
An alternative is to include a temporary badge on every Dispatch Ticket. As previously noted, scanning of a temporary badge on a printed dispatch ticket causes the system to search for an open dispatch for that customer and start the check-in process. To set this up:
Dispatch Ticket Temporary Badge
| Copyright © MyFBO.com [email protected] |
05/26/11 cli