| Adding a New Customer | Back Forward Print this topic |
See also:
Change or Reset Passwords e-learnings: Create a New customer Put a Customer In Focus Update Customer Information |
|
Adding a New Customer
New customers can be added from the FrontDesk Tab.
From the Front Desk / Focus Ribbon
To add a customer from the FrontDesk Ribbon, click the Select Customer option, then click Create New Customer. Enter their name in the first and last name fields, and then click the Continue button. On the resulting Create a New Customer page, fill in all the available information for the customer and then press the Create button at the bottom of the page.
From the FrontDesk / Button Menu
To add a customer from the FrontDesk Button Menu, click the Change Focus button, then click the Create New Customer button. Enter their name in the first and last name fields, and then click the Continue button. On the resulting Create a New Customer page, fill in all the available information for the customer and then press the Create button at the bottom of the page.
Creating a Ground Services Customer from Tail Number
The fastest way to create a customer record for a new ground services customer is by aircraft tail number. MyFBO will attempt to retrieve associated aircraft information and registrant information directly from the FAA Registry.
The first way to create a new customer by tail number is to use the small aircraft icon located on the FrontDesk Tab. Simply click the icon, enter the tail number, and select the option to Create New Customer.
The second way to create a new customer by tail number is to use the Select Customer / Create New Customer option available on the FrontDesk Tab. On the resulting Create New screen, use the From Registration Lookup option to enter the tail number.
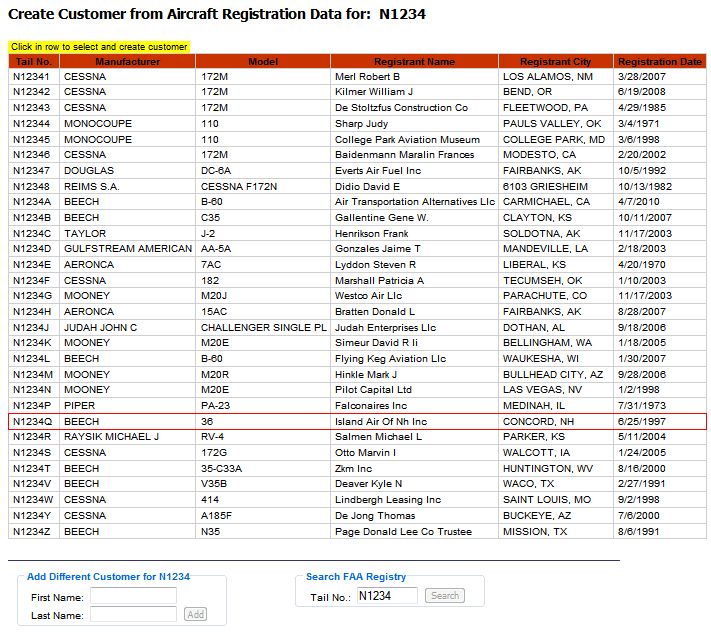
Either of the above methods will result in the same selection screen to find the customer in the FAA registry. For example, if N1234 is entered as the tail number, the resulting selection screen would look like the screen shot shown below.
Aircraft Selection Screen

Notice that multiple listings appear for N1234. To confirm that N1234Q is the new customer to be added, simply click on that row in the report to continue the customer creation process.
Change Customer Information
Regardless of the method used to create the customer, after the customer is created, the Change Customer Information page appears. Click the General Information link.
To be able to log in online, the customer must have an email address or short login code entered in this section. They will also need a password. Check the option labeled Set initial password to "reset". Temporary passwords for customers are always the word "reset". The next time the new customer logs in on their own, they will be prompted to enter a new, private password.
Scroll down to the "Scheduling and Dispatch" section of the page to set the customer's online scheduling privileges. (Employees must always have the option Customer Can Schedule set to YES before they can be granted staff login privileges.)
Note: If a customer forgets their personal password it can always be reset by someone with Manager Access or higher. Passwords can be reset from the Change Customer Information page as discussed above, or from the Reset Password/Change Customer Scheduling Authority option on the Manage Tab / User Security menu. Staff members can not reset customer passwords unless they have been given permission in the Staff Parameters.
| Copyright © MyFBO.com [email protected] |
05/03/11 cli